Remember the button bowl I made some time ago? You can read all about it here.
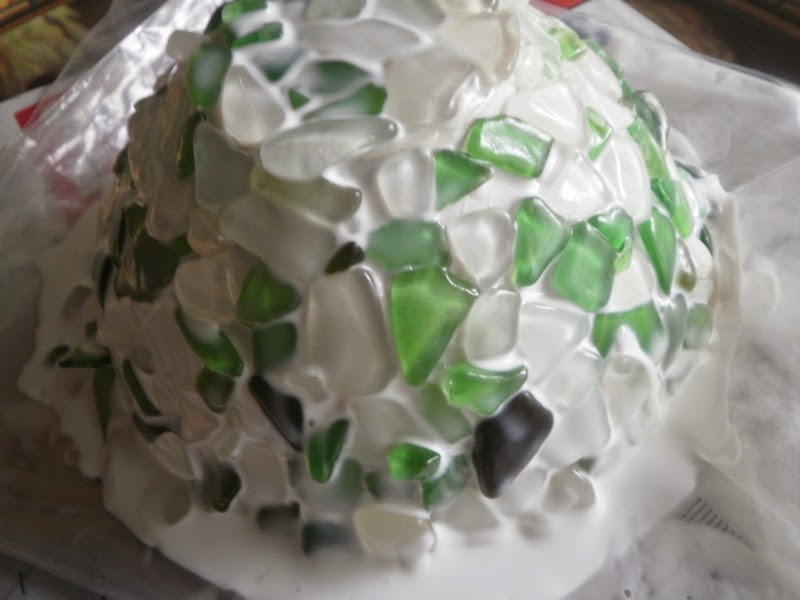
Well after a while I tried the same technique and made a sea glass bowl. At last I am showing it to you.
So I took a small bowl. Covered it in cling film.
I covered the cling film with Mod Podge (you can use Atlacol as well) and then started glueing various pieces of sea glass on it.
When I finished it I let it dry.
Then I added a rich amount of glue all over it.
I let it dry for 24 hours.
Then I took off the bowl and the wrap.
And let it dry from the inside too.
When the glue dried it looked diaphanous.
The bowl is a bit soft and I often rearrange its shape.
But I love the way it looks.
And added some semi precious stones in it that I bought from the Smithsonian Natural History Museum in Washington DC.
Showing posts with label Mod Podge. Show all posts
Thursday, 18 December 2014
Sunday, 26 October 2014
Something with buttons.
My friend Anna, the creative imaginative person behind in my closet blog and inmyc etsy shop invited us all to take part in a competition on her page on facebook.
The subject of the competition was "Make something with buttons".
So I thought about it, and remembered I had seen something a long time ago on pinterest. I really wanted to make something like that.Or like that. It looked simple enough!
As the deadline is the end of October I had to rush!
Phew!Pals that was hard. Although you can see tutorials on pinterest and people show off what they made successfully, for me it was very hard. I used ModPodge for the first time. I recently found it being sold at Xeirotxnika at Ftiaxto.gr and really wanted to see why people in the States are crazy about using this glue in their crafts so I bought some.
I started with a balloon that I put standing on a jar. I put some Pod Podge and let it dry. Then I added more glue and the buttons.
I had to use almost half the jar to finish this project and although I did exactly what the tutorial said the buttons kept sliding down no matter how I turned the balloon. And till the glue got totally dry I missed some of them!LOL!It was maddening!
It took me four days to finish this,oh yes! And I used up all of my little buttons!
So I had to buy some new ones and the cheapest solution was a little box of buttons from Jumbo!LOL! Going there I felt like a kid. I had to buy all kinds of little cheap things to make more handicrafts with buttons. Here is what I bought.
More ballooons, just in case I am crazy enough to make more bowls with Mod Podge, some felt motifs I couldn't pass and the aforesaid buttons of course.
So I continued with my effort to finish the button bowl.
My little assistant Barca wanted to play when I let it dry in the cold air faster.
And I added more buttons that kept falling and more glue.
In the end and when completely dry I made a small hole to the balloon and let the air come out slowly.
And with dread I found out that the bowl was not ready yet because it was wet with glue from the inside.
So I had to allow it more hours to dry.
And in the end....ta-dah!
See that jello thing in between the buttons? Well I put that much glue that it became a thick layer of diaphanous material that keeps the buttons together, at last!
I could trim it all around but decided to keep it as is. Doesn't it look delicious? Almost ready to eat?
You can put anything light inside, here some candy, or just more buttons but not something heavy as it is fragile!
Of course I also had to make something out of aida and threads and felt and beads and add some buttons too, otherwise it wouldn't be me. There wasn't time for cross stitch (as I am in the middle of decluttering, reorganising my desk and bookcase but that's for another blogpost) so I chose some evenweave fabric, added some felt flowers, buttons, beads and did some ribbon ebroidery and ...ta dah!
And the colours so match my bedroom colours! I loved this one!
Finally I made a ring out of some buttons! But as I am an amateur in ring making I don't think it went that well. But still it is with a button!
So that concludes my "Something with a button" competition entries!
Bytheway Anna mentioned me recently in her blog about the workshop she organized back in June just a day before we left for the States. You can read all about it here. Thank you Anna!
But speaking about buttons I must tell you about a new cafe that opened in the city centre and it is called Button (=Κουμπί) Koumbi Coffee and Crafts I saw the advertising brochure in the Xeirotexnika welcoming bag but Anna told us about it in her blog so we had to go too. We met there for some coffee and to look around! It was fun seeing so many little details, so many craft opportunities and we enjoyed a good coffee and good company. We will certainly go again to craft too!
The beautiful shop sign!
Lots of things to use to make things with a small fee.
Buttons and beads of course!
Even the WC doors have very clever crafty little dolls on them.
There is a small exhibition of handcrafted items too that a person can buy.
We will soon attend a workshop there, which I am sure will be fun!
The subject of the competition was "Make something with buttons".
So I thought about it, and remembered I had seen something a long time ago on pinterest. I really wanted to make something like that.Or like that. It looked simple enough!
As the deadline is the end of October I had to rush!
Phew!Pals that was hard. Although you can see tutorials on pinterest and people show off what they made successfully, for me it was very hard. I used ModPodge for the first time. I recently found it being sold at Xeirotxnika at Ftiaxto.gr and really wanted to see why people in the States are crazy about using this glue in their crafts so I bought some.
I started with a balloon that I put standing on a jar. I put some Pod Podge and let it dry. Then I added more glue and the buttons.
I had to use almost half the jar to finish this project and although I did exactly what the tutorial said the buttons kept sliding down no matter how I turned the balloon. And till the glue got totally dry I missed some of them!LOL!It was maddening!
It took me four days to finish this,oh yes! And I used up all of my little buttons!
So I had to buy some new ones and the cheapest solution was a little box of buttons from Jumbo!LOL! Going there I felt like a kid. I had to buy all kinds of little cheap things to make more handicrafts with buttons. Here is what I bought.
More ballooons, just in case I am crazy enough to make more bowls with Mod Podge, some felt motifs I couldn't pass and the aforesaid buttons of course.
So I continued with my effort to finish the button bowl.
My little assistant Barca wanted to play when I let it dry in the cold air faster.
And I added more buttons that kept falling and more glue.
In the end and when completely dry I made a small hole to the balloon and let the air come out slowly.
And with dread I found out that the bowl was not ready yet because it was wet with glue from the inside.
So I had to allow it more hours to dry.
And in the end....ta-dah!
See that jello thing in between the buttons? Well I put that much glue that it became a thick layer of diaphanous material that keeps the buttons together, at last!
I could trim it all around but decided to keep it as is. Doesn't it look delicious? Almost ready to eat?
You can put anything light inside, here some candy, or just more buttons but not something heavy as it is fragile!
Of course I also had to make something out of aida and threads and felt and beads and add some buttons too, otherwise it wouldn't be me. There wasn't time for cross stitch (as I am in the middle of decluttering, reorganising my desk and bookcase but that's for another blogpost) so I chose some evenweave fabric, added some felt flowers, buttons, beads and did some ribbon ebroidery and ...ta dah!
And the colours so match my bedroom colours! I loved this one!
Finally I made a ring out of some buttons! But as I am an amateur in ring making I don't think it went that well. But still it is with a button!
So that concludes my "Something with a button" competition entries!
Bytheway Anna mentioned me recently in her blog about the workshop she organized back in June just a day before we left for the States. You can read all about it here. Thank you Anna!
But speaking about buttons I must tell you about a new cafe that opened in the city centre and it is called Button (=Κουμπί) Koumbi Coffee and Crafts I saw the advertising brochure in the Xeirotexnika welcoming bag but Anna told us about it in her blog so we had to go too. We met there for some coffee and to look around! It was fun seeing so many little details, so many craft opportunities and we enjoyed a good coffee and good company. We will certainly go again to craft too!
The beautiful shop sign!
Lots of things to use to make things with a small fee.
Anna looking at the little bags one can buy at very reasonable prices and make something on the spot!
Even the WC doors have very clever crafty little dolls on them.
There is a small exhibition of handcrafted items too that a person can buy.
We will soon attend a workshop there, which I am sure will be fun!
Subscribe to:
Posts (Atom)